Author: Samantha Stevens

My name is Samantha and I have been an Interior Designer for 10 years. Designing is a passion of mine and I love what I do. I also have a green thumb and enjoy gardening in my free time. I live in San Diego which means plenty of sun all year long.

Lawn Mowing Basics – Removing Debris

It is always recommended that you take some time before mowing your lawn to check for and remove any debris that may have found its way into your yard. Removing the debris will help speed up the lawn mowing process while making it safer for yourself and anyone else in the area.

Lawn debris can come in many shapes and sizes. Large debris like lawn furniture and toys can be easy to spot. Smaller debris, however, like rocks, sticks, and pet waste, aren’t always so easy to find. Regardless of size, any debris that you find should be removed before mowing your lawn.

Even if you’ve done a check for and removed any visible debris, it is still a good idea to wear protective clothing like long pants and shoes when mowing the lawn. Better safe than sorry in the event that you have missed any debris because it might end up being tossed around by the spinning lawnmower blade. Protective eyeglasses are also a good idea for the same reason.

Before mowing your lawn, always remember to check for and remove any visible debris. Not only will removing debris allows you to mow your lawn faster, but it will also help to prevent injuries caused by flying rocks, sticks, or other such items that may be tossed around by the spinning lawnmower blade.

Is Recycled Water from My Saltwater Aquarium Safe for My Plants?

You’ve heard of people watering their plants with recycled aquarium water. They’ve said it’s worked wonders for their houseplants, which are now looking healthier than ever. It sounds like a great idea and you are seriously considering trying it out for yourself. The only thing stopping you is that your home aquarium is filled with saltwater and you are concerned that the salt may be harmful to your plants.

If this is sounding anything like your current predicament, then you were right to be concerned. Though water from an untreated freshwater aquarium is often beneficial to houseplants, water from a saltwater aquarium is not. In fact, salt actually inhibits a plant’s ability to properly hydrate itself and prevents it from processing the essential nutrients needed to maintain its optimal health.

By choosing to water your plants with recycled water from your saltwater aquarium, you run the risks of stunted plant growth, wilted or yellowed foliage, and upon long term saltwater exposure, the probable death of your houseplants altogether. To avoid this scenario, be sure to never water your plants with recycled water from your saltwater aquarium.

Save Water by Creating Your Own Low-Flow Toilet

Those wishing to save a few dollars on their water bill should consider creating a water displacement device for their old-style toilets. Not only are they simple to create, but they can also be made at no cost using everyday items found around the house. A water displacement device can help you to conserve a great deal of water by converting your regular commode into a low-flow toilet.

To create your own water displacement device, you will need a plastic bottle (with a lid) and some small rocks or sand. An old half-gallon juice container works well for this purpose, but a smaller container can work just as well – though it will only conserve as much water as can fit in the bottle.

Remove any labels and fill a portion of the bottle with the rocks or sand. Fill the rest of the container with water and seal it shut using the lid. The added weight of the rocks or sand is important because without it, the bottle will move around in the tank and this may prevent your toilet from functioning properly.

Once you’ve finished sealing the bottle, it’s time to place it in the tank of the toilet. Slowly immerse the bottle, letting the extra water in the tank drain out the overflow tube. As the bottle reaches the bottom of the tank, make sure that it is away from any working parts of the toilet and that it is heavy enough to sit firmly without moving. If the bottle moves very easily in the tank, you should add additional rocks or sand.

When the bottle is securely in place, return the tank lid to its rightful position and test the toilet to make sure everything is working correctly. If the toilet doesn’t have enough water pressure to function properly, a smaller bottle should be used instead.

By creating your own low-flow toilet, you are able to lower the cost of your water bill while helping the environment by using less water. Not only is making your own water displacement device incredibly simple it is also free to do. Convert your toilet and start reaping the benefits of lower water usage today!

Conserving Water: In the Yard

A large portion of outdoor water usage goes toward keeping our lawns and gardens looking their best. If you could maintain the look of your yard while conserving water, would you be willing to make some changes? If so, there are many ways that you can use less water around the yard. Here are a few ideas to get you started.

Switch to a Native Grass

If you wish to both conserve water and keep your lawn looking green, consider switching to a species of native grass. Most lawns contain imported grasses that aren’t suited to the local climate and require a large amount of water to keep them looking at their best. A native species of grass will thrive under the typical conditions for your area so long as your lawn receives the normal amount of yearly rainfall. If you are facing an unusually dry summer, it may still be necessary to occasionally water your lawn.

Change Your Watering Schedule

If the time comes that you must water your lawn or garden, do so in the early morning or late evening. By watering when the sun is low on the horizon, less water will be lost to evaporation. With the moisture remaining in the soil for a longer period of time, your lawn or garden will receive the maximum benefit of the water. To reach the same level of ground saturation in the heat of the day requires much more water.

Install a Rain Barrel

Available online or from your local garden store, rain barrels are great for both conserving and storing water in the yard. Because the container is refilled with each rainfall, you will have an excellent source of fresh water that can be used during periods of dry weather. If your lawn and garden require a large amount of water, it may be necessary to purchase a series of connecting rain barrels to maximize the amount of water that is collected and stored.

Many people are unaware of how easy it is to conserve water in the yard. By changing a few simple things, it becomes much easier to use less water while maintaining your lawn and garden. Whether you switch to native grass, change your watering schedule, install a rain barrel, or any combination of the three, you will be doing your part to help conserve the world’s diminishing supply of fresh water.

Household Money Saving Tips – Conserve Water, Save Money

In our present day economy, many families are looking for ways to cut the cost of their household bills. If you too are looking for ways to spend less this year, then it’s time to cut back on your household water consumption and enjoy a less frightening balance on your water bill. By following a few simple suggestions, you too can see your water bill become much cheaper.  Click “Continue” to learn more about how you can save money!

Save Money By Changing Your Lawn Watering Schedule

With water bits always on the rise, many people are looking for new ways to conserve water around the house. One easy way to use much less water and out the costs of your monthly water bill is to change your lawn watering schedule. The idea is, use less water to keep your lawn green and healthy looking, while watching your water bills become less expensive.

At first, this doesn’t seem to make much sense. How is using less water really going to keep your lawn green and healthy looking? The answer is simple. By simply choosing to water your lawn either in the early morning hours or later into the evening, you will use much less water and receive the same level of ground saturation.

The reasoning behind this theory is sound. Because water evaporates at a much faster rate during the midday hours, you will need to water for much longer periods of time just to keep your lawn looking its best. By choosing instead to water for a shorter span of time during the morning or evening hours, less water can be wasted to evaporation, allowing more water to sink into the roots.

With more water now reaching the roots of your grass, you will be able to stop watering your lawn much sooner than was possible before, while still achieving the same great looking lawn. As was stated above, you’ll be using less water while maintaining your green and healthy looking lawn, making the costs of your water bill noticeably smaller.

Water Conservation – Make the Switch to Low Flow Toilets

As toilets are arguably the most water-consuming appliance in the home, replacing old toilets should be at the top of the list for anyone that is trying to make their homes more water-efficient. Since standard toilets use substantially more water than their new low flow counterparts, replacing them with a more efficient model should take priority above other water-saving efforts around the home.

When purchasing low flow toilets, you have a couple of options to consider. There are standard low flow toilets, as well as ultra-low flow toilets with dual flush capabilities. Both types of toilet use much less water than a traditional toilet, making both an excellent choice for your bathroom.

Low flow toilets, sometimes referred to as low flush toilets, came into popular use in the early 1990s. Instead of the standard 3.5 to 7 gallons of water that traditional toilets use, the newer low flow toilets use no more than 1.6 gallons of water per flush. Many countries, in fact, have witnessed the true value of low flow toilets and have set in place rules forcing toilet manufacturers to stick to a strict maximum of 1.6 gallon per flush.

The second option consumers are presented with is an ultra-low flow toilet with dual flush capabilities. Though dual flush toilets also come standard with a 1.6 gallon flush capacity, they also include a “half flush” option reserved strictly for flushes containing liquid waste.

A common myth surrounding low flow toilets is that using less water can lead to poorer toilet performance. Luckily, however, this isn’t the case as all newly designed low flow toilets have increased flushing velocities, and as such are still able to provide the same high quality of water pressure as older toilets.

By choosing to use a low flow or dual flush toilet, your home will be well on its way toward reaching your water conservation goals. So, if you haven’t made the switch to a low flow toilet, what are you waiting for? Make the switch and start conserving water in your bathroom today!

Watering Tips That Will Make Your Garden Thrive

Everyone understands that watering is a necessary part of the maintenance of any garden, but many gardeners could be more efficiently watering their plants. To do this, it is very important to know how much water is best for your plants, because some types of plants will require more water, while others will be okay with less. Be sure that you check the watering directions for the plants in your garden so that you can provide your plants with the precise amount of water that is right for them.

Once you know the ideal watering conditions for each of your plants, it is important to monitor the moisture content in the soil around them on a regular basis. This alone can provide a good indication of how deeply and often you should be watering. If the soil conditions feel too dry or too moist for your particular type of plants, then you may need to be watering more or less, depending on your findings.

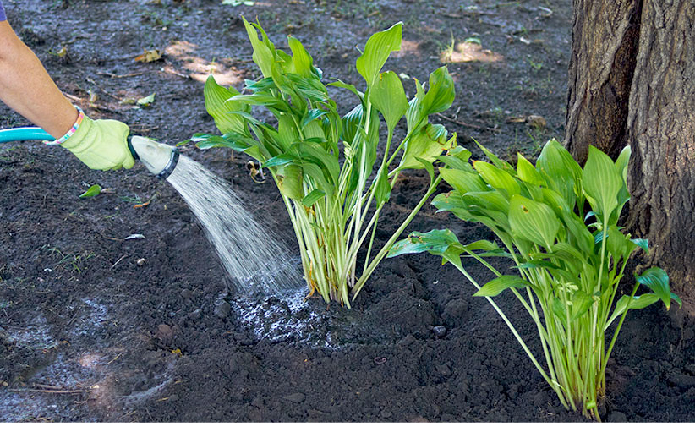
Either way, when you do water, try to water from the base of the plant instead of from above. Watering from above will leave some of the water on the leaves of the plant, which will then quickly evaporate. Watering the leaves of certain plants could also lead to such troubles as burn spots, rot, or fungi. By watering at the base of the plant, you will allow more water to reach the roots, where it can be of most benefit to the plant itself.

Now that you know where it’s best to water, it is important to know when it’s best to water. Watering is most efficiently done during the early morning hours or in the evening. The key is to water your garden when the sun isn’t at its highest. With less sunlight and lower temperatures, the roots of the plants will have more time to absorb the water, before it is lost to evaporation.

To further avoid evaporation during the day, it is always a good idea to use mulch around the base of your plants. Mulch is a protective ground cover made from a variety of materials like grass, leaves, bark, or woodchips, and serves many purposes beyond simply retaining water in your soil. Organic mulches also help to reduce erosion, suppress weed growth, and nourish plants as they naturally decompose.

By watering your garden more efficiently and using mulch to help keep that water within your garden’s soil, you will be providing your plants with the conditions in which they can thrive. From now on, be sure to monitor your soil’s moisture content, water from the base of the plant during the early morning hours or in the evening, and add mulch to help keep that moisture where it belongs. Your plants are bound to appreciate your extra watering efforts.

Which Type of Mortar Should I Be Using When Repointing My House?

If you have been thinking about repairing your old crumbling mortar by repointing it, you might be wondering which type of mortar is the best to use. With the average repointing job being such a large and time-consuming task, it is important that you don’t buy the wrong kind of mortar or you may be forced to make repairs again in the near future.

With so many different kinds of mortar to choose from, how do you know which kind of mortar is best for your particular repointing project? The answer to this question depends on the type of mortar that was used during the original masonry. It is important to use a similar and compatible mortar when repointing so that the new mortar will better bond to the surfaces and not crumble or erode away prematurely.

If you are like most people, you probably don’t have the slightest idea as to what kind of mortar was used during the original masonry. Fortunately, this isn’t a problem. An architectural conservator can analyze the components of your original mortar and recommend to you the best repointing mortar for the job.

Once you know which type of repointing mortar is best for your project, all there is left to do is carefully remove the old and crumbling mortar and replace it with the new mortar. Properly repaired mortar typically lasts for around 25 to 50 years, so be sure that you use the right kind of mortar the first time around and follow any directions carefully so that your repairs will last for as long as or longer than expected.